|
Listen to this article
|
You can easily renew your Indian Passport in the USA after 10 years with VFS Global.
A step-by-step process for re-issue of the passport with the Indian embassy in New York, Houston (Texas), Washington DC, Atlanta (Georgia), Chicago (Illinois), SFO (San Francisco, California), and Seattle Indian consulate.
Choose the correct embassy based on your address to avoid rejection.
This article will discuss:
Passport Renewal Process Snapshot
- Create a Passport application on the Indian government Website.
- Create an account on VFS Global, and pay the shipping fee.
- Collect documents and mail them to VFS Global.
- VFS verifies documents and sends them to the Indian embassy.
- Indian embassy triggers Police verification in India.
- Indian embassy prints a new passport.
- VFS will send you the new and old passports.
Processing Time
Your Indian passport renewal will take 3-6 weeks if the last passport was issued in India.
If your last passport was issued by the Indian Embassy in the USA, you can get a new one in 10 days.
You can apply for renewal 1 year before expiry. We recommend applying 6 weeks before the final expiry to avoid issues with delays in processing at the Indian embassy.
Documents Required
Create all affidavits and annexures required for Indian passport renewal in one go with our easy-to-use app.
Create all affidavits required for Indian passport
#1 Expiring Passport
An original and most recent passport is required to be sent. All other OLD passports, if any, are not required.
#2 Photographs
A total of 2 photos of size 2×2 Inches are required for passport renewal.
The photo should have a white background and not off-white.
You can get passport-size photos online or at Walmart, CVS, or Walgreens.
#3 NRI Government passport renewal application form
The passport application form will be provided by the Indian government site for printing. Detailed steps are given below.
#4 Highest qualification degree (Optional)
Indian embassy requires your education details to decide if an ECR Stamp is required on your passport or not.
We recommended sending a copy of the Highest Educational Qualification Degree like an MCA or MBA. It is not required but there is no harm in sending it.
Check if you need ECNR or ECR.
#5 USA Address proof (Color, Notarized)
You can safely opt to get the USA address printed on an Indian passport. There is no harm.
- Rental Lease Agreement (Month to Month is acceptable) OR Home Mortgage bill – Should not have expired at the time of submission. Rental agreement with future start date?
- Any utility bill (Electricity/ gas/ water/ landline telephone bill) – Must NOT be older than 3 months. Home Internet Wi-Fi bills and Mobile bills are NOT accepted.
- Driver’s License OR State ID – Both front and back are required. A Learning / temporary driving license is accepted.
- A US bank statement is NOT valid address proof.
#6 Indian Address Proof
Indian address proof is required if you want to add or change the current Indian Address printed on your passport.
Does the current passport have an Indian hostel as a permanent address?
Need Help File Application?
Support
Use hassle-free visa extension and EAD filing service to file your application with USCIS
Visa status issues consultation includedQuick Service
Filed within 1-2 days if you have all the documents ready and uploaded
Emergency service availablePhoto
You click, we edit photos as per US visa requirements to remove background, align face and shoulders
Photo printing included- Any Indian utility bill (Electricity/ gas/ water/ landline telephone bill) – Must NOT be older than 3 months
- Aadhar Card
- Indian Drivers license
- Recent Bank Statement from Indian Government Bank. The front page is required. It should have an affixed photograph. Check a sample of SBI’s passbook with affixed and stamped photographs here.
#7 Change of Appearance / Signature Form (Notarized)
A change of appearance form is required. You can either download and fill out the form yourself or use this app to create one.
Create Change of Appearance Affidavit
Everybody’s presence changes a little as you age.
#8 VFS Document checklist
Download the VFS document checklist here. Print and fill it out as you collect documents.
#9 Annexure ‘E’
Annexure E affidavit is required and you can get it from the VFS site.
You can also create the same form using this app which validates all your data and offers a full refund if it is rejected by the Indian embassy:
Create Annexure E Affidavit for Indian Embassy
#10 Copy of Passport
Photocopy of the First 5 pages of YOUR passport along with the last 2 pages. You can use an app-based scanner.
- First page with Photo, then page numbers 1, 2, 3, 4, 5.
- Page numbers 34, 35, 36, and the last page with the address.
- Total of 10 pages.
#11 Marriage Certificate (Optional)
Are you Married and want to add your Spouse’s name to the new passport?
- Include Spouse’s Passport’s front (page with picture) and back page (with address) OR
- Spouse Green Card
#12 US Legal Status (Color, Notarized)
- Current Valid US Visa (including dependent Visa) OR
- I-797 OR
- Green card OR
- Employment Authorization Card (EAD) or
- I- 797 approval notice or
- Valid I-20

You can even use the USCIS receipt number copy.
H1B / H4 Extension pending with USCIS? Apply with i797C.
- US Visa – B1/B2 is NOT a valid visa for passport reissue.
- i94 is not valid Proof either.
#13 Birth Certificate / School Leaving Certificate (Optional)
#14 Police Report (Only if Passport lost or stolen)
#15 Additional Documents for Child Passport
Annexure D is required for the Child’s Indian passport. You can create this affidavit using this app which will validate all the data to make sure it is not rejected by the Indian embassy.
Create Annexure D
- Annexure D is signed by both mother and father.
- Mother – Current Valid US Visa OR I-797 OR Green card OR Employment Authorization Card or I-797 approval notice.
- Mother – Passport first (Photo) page and last page (address page).
- Father – Current Valid US Visa OR I-797 OR Green card OR Employment Authorization Card or I-797 approval notice.
- Father – Passport first (Photo) page and last page (address) page.
#16 Annexure F/L for lost or damaged passport
If your current passport was lost or damaged, then you need an Annexure F affidavit too.
Registration Steps – Indian Govt Website
Start your passport application here on the Indian government website.
You will need to register for each person separately on this website. We suggest using this website on your laptop or PC as the site is messed up on mobile.
#Step 1 Click the ‘Register’ button and fill in the details.
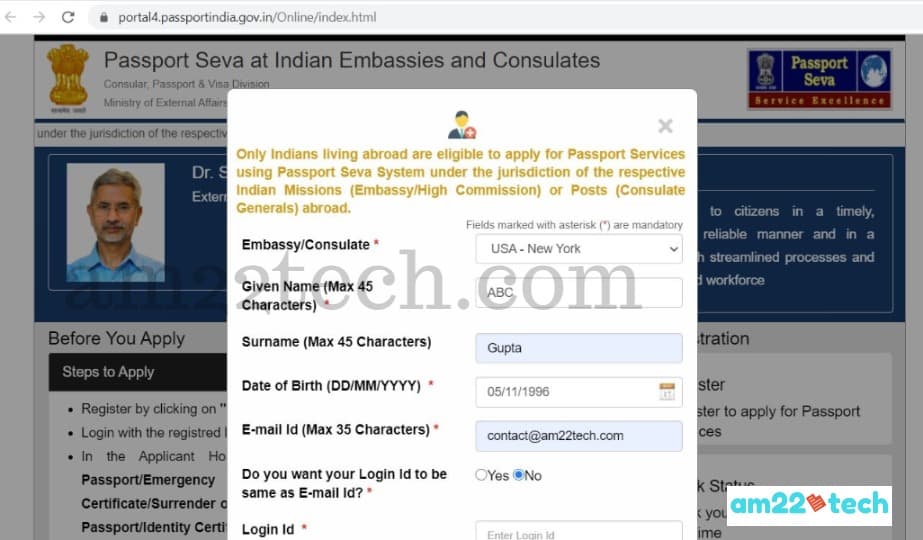
#Step 2 An email is sent to you to verify your email. Click the link in the email to activate your online account.
#Step 3 You will be asked to log in again after you have activated your account. Log in again and then this screen will be visible:

Select the option “Apply for Ordinary passport – Application for fresh passport/Re-issue of Passport (Blue cover passport)“
Passport Application Steps – Indian Govt Site
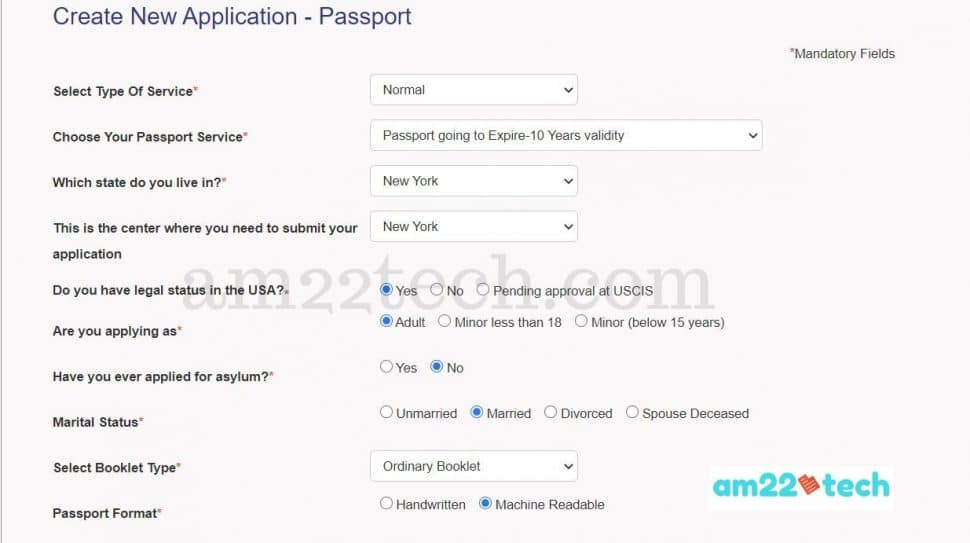
#Step 1 Start the Passport application by filling ‘passport-type‘ section.
These are the sample values that will apply to most people.
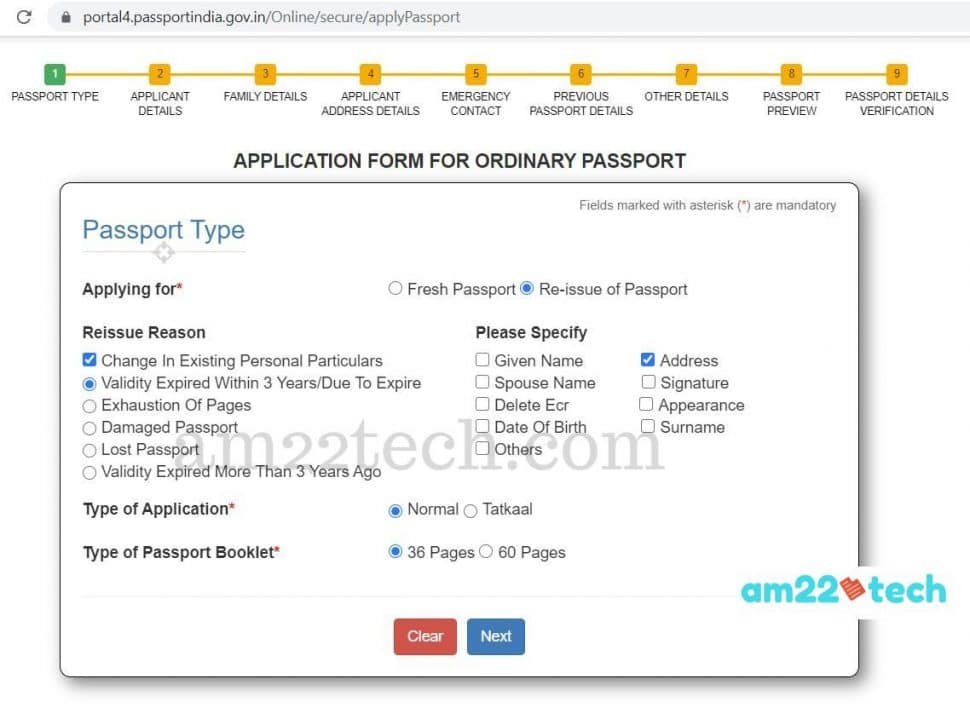
- Choose ‘Re-issue of passport‘.
- Choose ‘Change in personal particular‘ and then select ‘address‘ if you are changing your address from India to the US or a different address within the USA. You can select more options if you want to change more things on your passport.
- Choose ‘Validity expired within 3 years/Due to expire‘.
- Select the Type of application as ‘Normal‘ or ‘Tatkal’. Tatkal will have a higher fee than normal.
- Select ‘Type of Passport Booklet‘ as ’36 pages’. Most people only need 36 pages unless they travel a lot and your passport pages get full within a couple of years.
#Step 2 Click next and fill in ‘Applicant details‘. Click next once done.
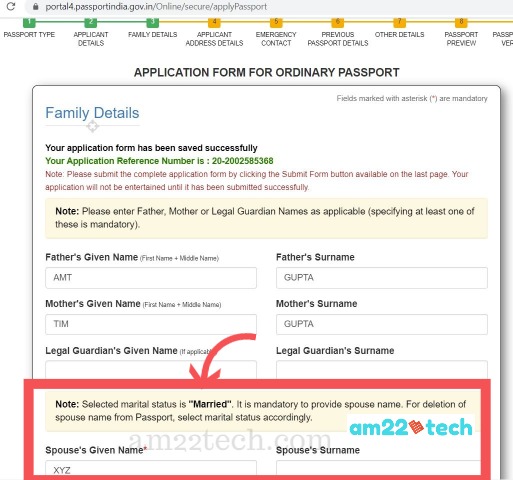
Once you click ‘Save’, your application is saved and an ‘Application reference number’ (ARN) is generated and shown on top of the current page:

#Step 3 Family Details
Enter family details like Father, mother, and spouse name.
Spouse name is mandatory if you have selected the marital status as ‘married’.
#Step 4: Applicant Address Details
Your presence at an Indian address is not mandatory. Indian embassy understands that you are physically present outside India.
It is mandatory to provide at least one Indian address in the form. It will be used for police verification. You can give your parent or relative’s Indian address.
You can choose these combinations:
| Passport Print Address | Other Address |
| USA | Indian |
| Indian | USA |
In this example image, we are opting to print a US address on the passport and then providing an Indian address as ‘other address’:
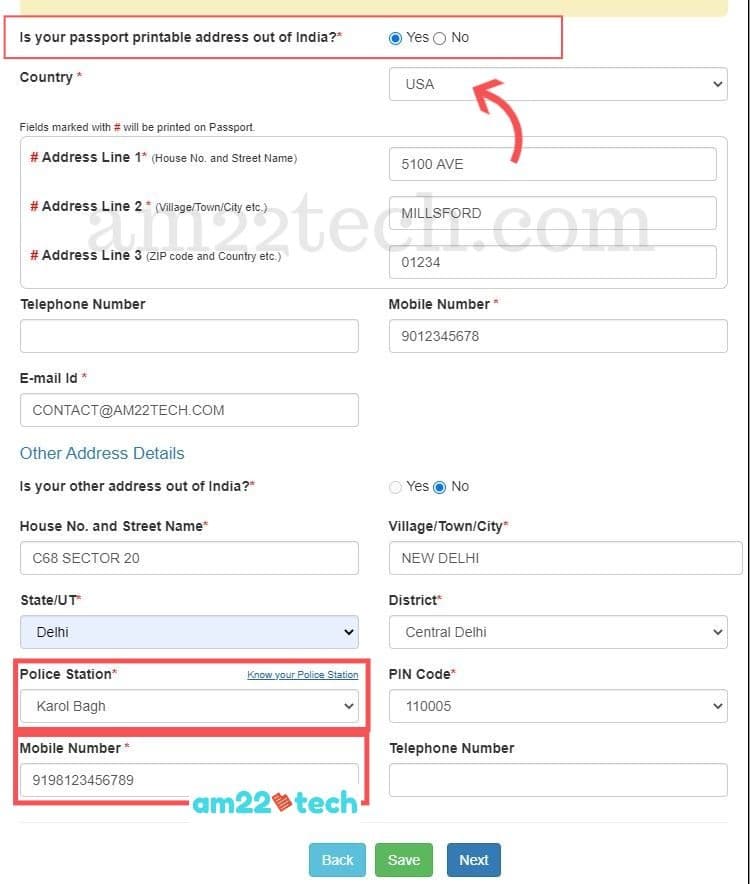
Note:
- Indian mobile number should be valid as someone will call it for police verification.
- Choose the correct Indian police station as per your Indian address to avoid delays in your application.
- Your relative should be able to vouch for you when they call.
- As is expected in most places, they may have to give a nominal amount as ‘chai paani‘ to the police officer. The usual amount that most people have reported to have paid is about INR 1000 to 2000. They expect it as you are earning in Dollars 🙂
#Step 5 Enter emergency contact details
We suggest providing details of the person who you know in the USA. You can provide anyone from India too. It’s your choice.
#Step 6 Previous Passport Details
Enter details and click next.
#Step 7: Other Details
Enter details and click next.
#Step 8 Passport Review
Enter details and click next.
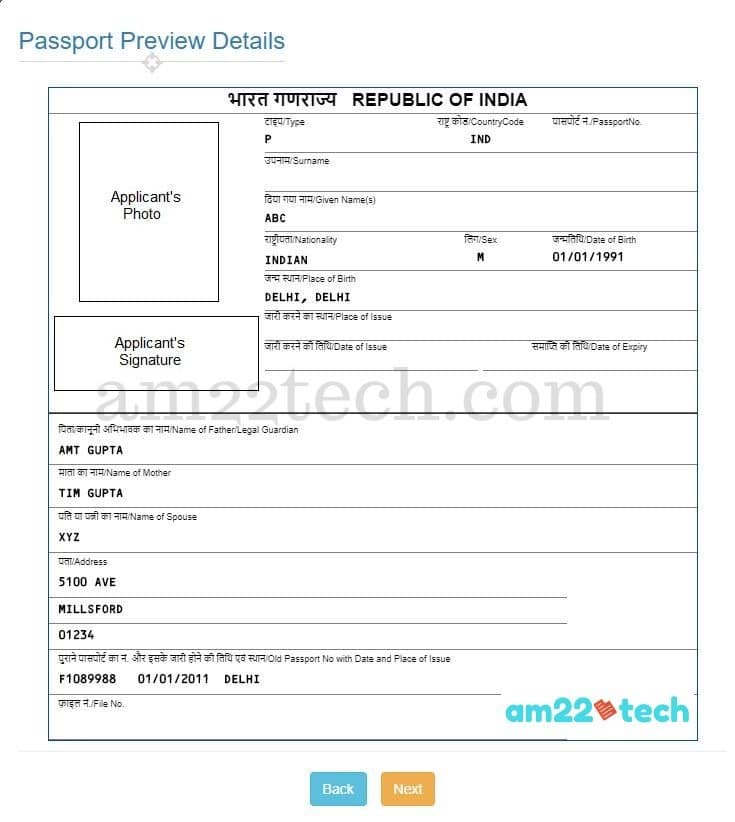
#Step 9 Passport preview
Step 9 shows a nice preview of the new passport’s biometric page. Verify your information and click next.
#Step 10 Verify and Submit
The last step is to verify all the details and then submit your application. You can make changes before clicking the ‘Submit‘ button.
Your application is locked once you click ‘Submit‘ and changes cannot be made.
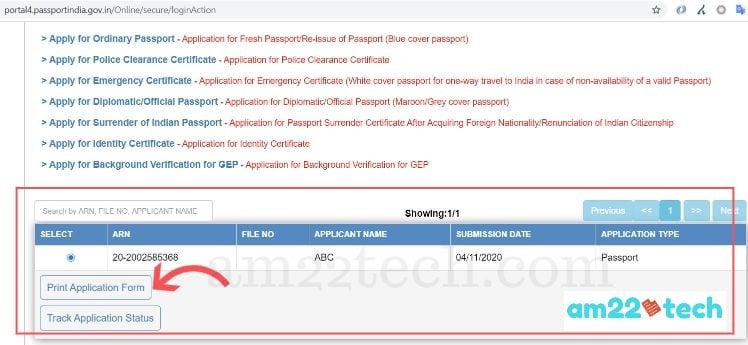
Print Passport Application
Once you have submitted it, you can print the application from the Applicant Home page.
You should print the passport application on one side of the white paper only. Leave the back side blank. Do not double-print.
You should sign the printed application with a black or blue pen only.
VFS Global Website – Fee Payment & Shipping
VFS’s website and the instructions are half baked and it seems they have been given the contract at the last moment.
The link given on the VFS website will waste your time filling out the form even before registration.
But, the problem is that there is no other way to register either (at least we could not find any).
VFS services are used for postal Envelopes, Payments & shipping of your documents.
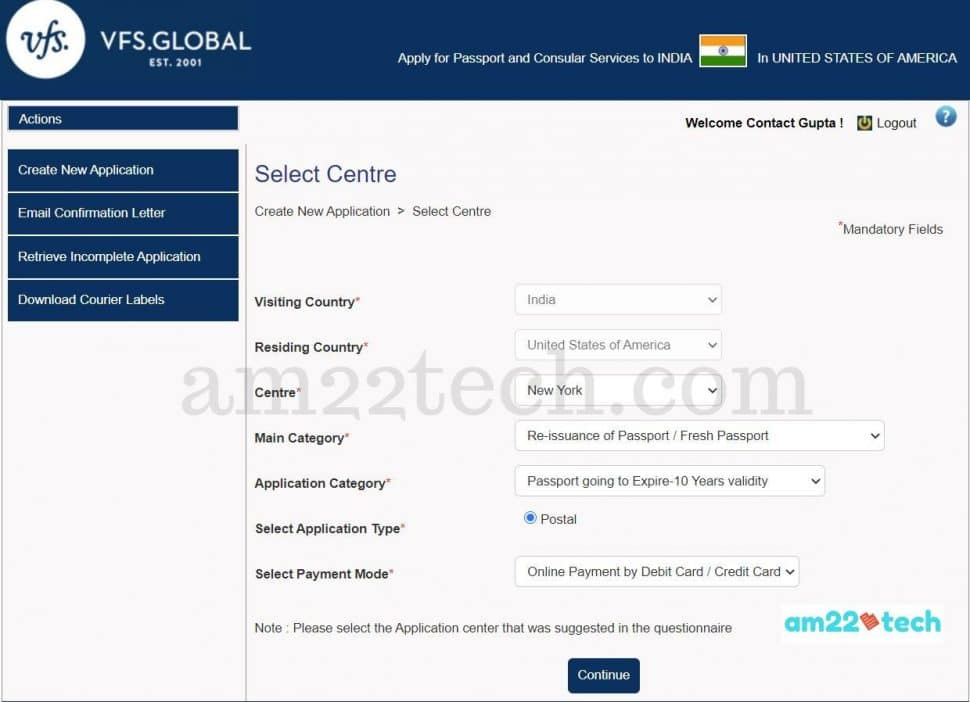
#Step 1 Visit the VFS global website and create an application there.
This is also not a mobile-friendly website. So, we suggest using a desktop.
Select the ‘Passport‘ box (Blue color) and then you will see a new form open up:
Click the button ‘Proceed‘.
#Step 2 Fee Details
The total fee for Indian passport renewal is $100+. VFS service fee is also added separately.
Now, once you click the ‘proceed‘ button, you will be asked to register and activate the registration by email. Once you are done, you will have to REDO the whole VFS application. Amazing!
#Step 3 Click ‘Create a new application’.
Enter the details again on this page after logging in to the VFS portal system.
#Step 4 Click the ‘proceed’ button and you will be asked to add a customer.
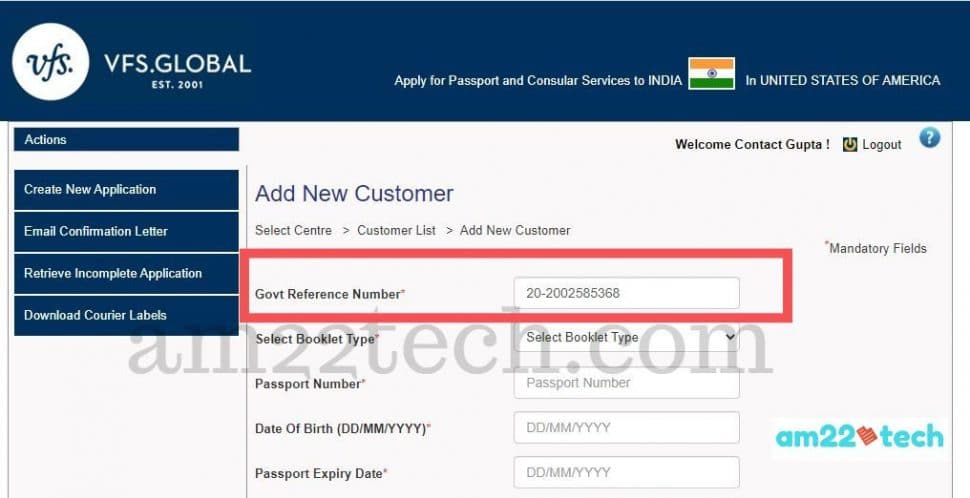
#Step 5 Click ‘Add customer‘ and you will see this screen where you will be asked to once again enter all your information.
Make sure you enter the Indian government website’s ARN number in the ‘Govt reference number’ field:
Click the ‘Submit‘ button.
#Step 5a Many people have complained that they are not able to see the ‘select courier service’ after adding a customer.
Try this as it worked for us:
- Log out and Log in again to the VFS Global portal.
- Click the ‘retrieve incomplete application‘ button (blue color) given on the left-hand side menu.
- Use your registered email (used to register on the VFS site) and click search.
- You should now be able to see the ‘Select courier‘ option on the customer list screen as shown in our next step below.
- If you are still not able to see the ‘select courier service‘ option, then click the ‘Edit‘ link given in the ‘Actions‘ column next to your name list. This should show the courier service option.
#Step 6 Select Courier Service
You reach the customer list screen.
Note down the VFS reference number. This will be required to search your application if you are automatically logged out.
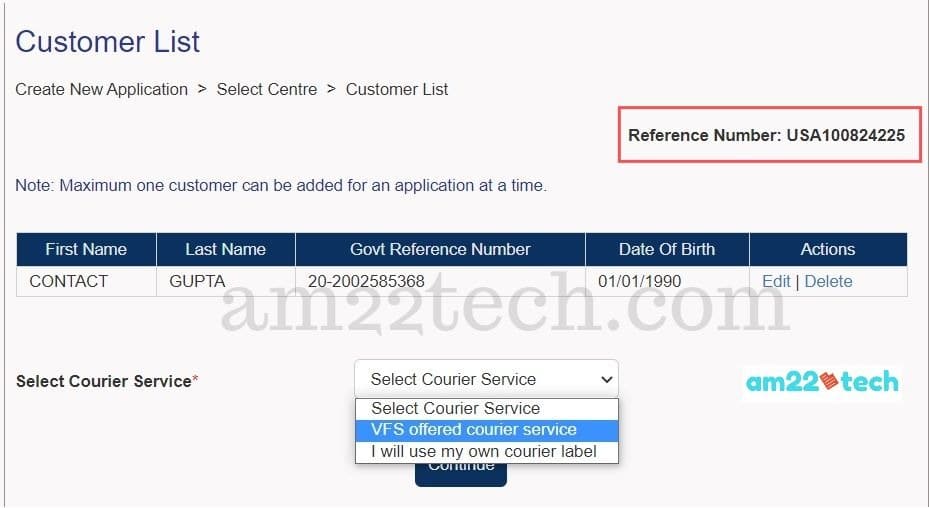
We recommend VFS’s shipping option. They use FedEx and the cost is $30 for two-way shipping.
If you decide to use your courier service, do not forget to send a pre-paid envelope for return shipping.
- USPS prepaid labels have an expiry date and hence are not accepted by VFS.
- You can use UPS but the prepaid label with UPS Store address is not acceptable.
Click submit.
#Step 7 Courier Service Address
Enter your mailing address here and not VFS Global’s address.
The USA address on your prepaid shipping label should match the proof of address document submitted.
#Step 8 Confirm Application
Click the ‘confirm application’ button and then you will be automatically taken to a payment site named ‘Adyen.com’.
#Step 9 Download Courier Labels
Once the online payment is completed, you can download the shipping labels and send your application package.
Self Attest & Notary
Self attest means that you should sign yourself on the photocopy. No notary is required.
Self Attest these documents:
- Your passport copy of the First Five and the Last two pages.
- Indian Address proof (If Applicable for your case).
- Copy of Marriage Certificate (ONLY If you are married).
- Spouse Passport copy (ONLY If you are married).
- Birth Certificate / School Leaving Certificate.
- Police Report (Only if Passport lost or stolen).
A parent needs to sign along with his/her child.
- If the Child’s age is greater than 5 years, he should write his/her name them-self.
- If your child is less than 5 years old, he/she should use his/her thumbprint.
Both parent and child need to self-attest. Each parent should self-attest their document. Get your child to sign all documents too.
The mother should sign her own and the Father should sign his documents. The mother cannot sign the father’s document and vice versa.
For general documents (like forms), any parent can sign.
- CHILD’s – Passport copies of the first five and last two pages
- Child’s – Birth Certificate
- US Address proof – Utility bill or driving license or rental lease agreement on any one of the parent’s names.
- Indian Address proof – Utility bill or driving license or rental lease agreement on any one of the parent’s names.
- Mother’s – Color copies of passport pages that you have photocopied.
- Father’s – Color copies of passport pages that you have photocopied.
- Mother’s – Color copy of Visa or Green Card or I797 approval notice.
- Father’s – Color copy of Visa or Green Card or I797 approval notice.
- ANNEXURE ‘D’ – Affidavit for Applying for Minor Passport by parents
- Annexure ‘E’ – Specimen Declaration of the applicant on a plain paper
- CHILD’s – Color copy of Visa or Green Card or I797 approval notice.
Notarize
- USA Address proof – color copy
- Change of Appearance Form. Is AFFIDAVIT FOR CHANGE IN APPEARANCE mandatory if mine has not changed?
- Annexure D (for Child Passport)
- Copy of Visa or Green Card or I797 approval/pending notice.
Package, Mailing & Tracking
- Arrange documents in the order of the VFS document checklist with a checklist on top.
- Paste photo
- Stick one photo on the Indian government passport application form.
- Stick the second photo on ‘Change of appearance form’.
- (Optional) Use a small letter-style envelope to keep the passport just to have an extra layer of protection.
- Original Expiring Passport.
- Use a paper clip, paper pins, or a binder paper clip instead to tie all the documents together. Do NOT use a stapler.
Visit the FedEx office, pick up the FREE envelope (included in the shipping fees you paid to VFS), and send it with VFS’s FedEx shipping label within 15 days of generating the label.
NOTE: No need to send a return envelope. It will be taken care of by VFS if you opt for VFS shipping.
You can track your application status on the Indian government website or at the VFS site using your VFS reference number.
Refund
We have documented the process and VFS application refund policy separately here.
FAQ
The ECR and ECNR proof is not required for Indian passport renewal in the USA.
The ECR/ECNR status is available on page 2 of the Indian passport.
If it is not there or nothing is mentioned in your passport, you can select option ECNR (Emigration check not required) on point 13.
You can send a photocopy of your highest educational qualification degree like an MCA (Masters in Computer Applications) for ECNR proof.
If you do not attach any proof and your old passport does not have the ECR stamp, you will automatically be considered eligible for ECNR.
No notarization is needed. Just Self-attest with your signature and mark the photocopy with “For ECNR – Documentary proof”.
You can get Indian Passport photos at Walmart, CVS, or Walgreens. ePassportPhoto offers free delivery and just $1.5 per picture.
Your local city library, Bank (like Bank of America, and Chase), and your own office are the FREE notary options for Indian passport renewal.
USPS, FedEx, and other local mail shops would charge around $5+ per page of the notary.
An Aadhar number is not mandatory for Indian passport renewal in the USA.
The Indian passport application website does make it mandatory to provide a spouse’s name if you select your marital status as ‘Married’.